Thursday, January 30, 2014

Snow Days in NC

I am starting to get a little cabin fever... I've been off work Tuesday, Wednesday, and Thursday thanks to the beautiful snow we got here in eastern NC! Tuesday was a bust... meteorologists were forecasting snow to start around midday and last through Wednesday morning- totaling 8-10"+!! So our schools closed on Tuesday to prepare for the "blizzard". 2:00 rolls around, no snow. 4:00 rolls around, still no snow. 6:00- no snow. 8:00- no snow. Around 9:00 we started to get some action... in the form of sleet! Still no snow! Most people wouldn't say they wished they had gone to work on a day that they were given off... but with talk of making up the day on a Saturday, I was a little frustrated. It seemed it had been cancelled for no reason. I totally understand why they did it, based on the forecast. 

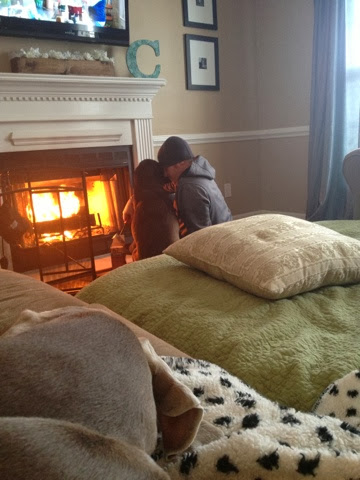
Anyway, I asked Ian to pull our mattress into the living room so we could sleep by the warm fire he had worked so hard to build! And it actually worked!! I am always trying to get him to camp out in the living room with me. It's so fun to do something different! We brought the mattress in from our room and set up our camp! 


It was so toasty!!! We were trying to decrease how hard our heating unit had to work during this storm... so we closed all the doors and kept the fire blazing so the living room would stay warm and the thermostat would register the higher temperature and therefore run less. At this point, it was still sleeting. No sign of snow. I felt like a kid on Christmas because I knew that when we woke up, there would be lots of snow (lots is used loosely here, lots in NC terms at least)! And I was right! 


It was nowhere near the 8-10"+ thanks to the hours of sleet we got versus snow. But it was so beautiful!!! 

We spent the morning with our puppies snuggled up in our warm house. 


That girl loves her daddy!

We ventured out in the afternoon for some snow time! 


The dogs had a hard time finding their tennis ball when it sunk into the snow... it left them a little confused!


We were bundled up!


Dixie LOVED her first big snow! Mostly she liked eating it!


And it is nearly impossible to get a picture of Benni when there is a tennis ball in sight. He is obsessed. 


In all of those pictures he is looking at the tennis ball, not the camera! 


When we came inside, the pups were a little tuckered out... 


5 minutes later...


They loved having the bed in the living room!


Spoiled rotten. 

We drank coffee, hot chocolate, and beer. We ate soup and grilled cheeses, chili, and made snow cream! 

I. Love. Snow. Cream. 

What I love more- chocolate snow cream! It tastes like a Frosty from Wendy's. I didn't take a picture of the snow cream because I was way too excited to eat it before it melted! 

To top off our last few days, our water heater has died. Just died. So if you can smell me right now, I apologize. Juusssttt kiddinggg. I got a shower before it died. I'll just have to wing it until tomorrow when we will hopefully have a new one installed! So excited that my in-laws are possibly coming tomorrow to help with the install! And soooo appreciative! I am also appreciative of ALL of our awesome friends who have offered up their own hot water to us! You guys are so sweet! Unfortunately for Ian and anyone else that has to see me- I am going to try and hold out! Simply to avoid the hassle of packing up my toiletries and trying to drive somewhere in this mess!

Ian headed back to work today, sadly. We basically got lucky with the way his schedule fell this week- that's the only reason we had the time together that we did! And I loved every second! But there are lives to save and surely enough there will be people attempting to go out on the roads that will need saving. I am going to attempt to be productive around the house today! 

I hope everyone is having a wonderful week!! 


Tuesday, January 28, 2014

Staircase Makeover Part 3

We're at it again! Back to work on the staircase... it's been driving us crazy living with it while it is under construction. I just don't like to look at it. So last weekend, we got re-motivated to push forward with this project. Last time we left off, I had stained the treads with two coats of stain. Well... in the meantime, we've been walking up and down the steps and it looked as though the stain was fading. So because of our procrastination, we created more work for ourselves! I decided I just couldn't go on with the project without adding one more coat of stain. So I did!

The next step was sealing the steps. After much debate, I decided on Minwax Polycrylic rather than polyurethane. Polycrylic isn't rated for floors, but after researching it I read that I may just have to re-seal them in a few years. That works for me! I've had bad experiences with polyurethane being sticky even after drying and I was not about to ruin all of our hard work!! So far, I've applied one coat. It needs two more! Here are some photos:

The top step in this photo has the polycrylic and the bottom step doesn't-


Same with this one-


So shiny! 

The next thing we tackled was the landing at the bottom of the steps. When we ripped the carpet up, we revealed a plywood base. It appeared that there were two layers so Ian attempted to cut the top layer off. We had to do this so that the flooring we added on the landing would be level with the lip of the landing that already existed. Here's what we found under plywood sheet #1:


Oh, what a lovely hole we found!!! So much for the plan to lay flooring over that layer. After much back and forth, we decided that laying flooring over the hole would not be sturdy enough. There was no support of any kind under the hole and walking near it made it sink down. We wanted to do this project right so Ian went to Lowe's and picked up a very thin sheet of new plywood and had it cut to size. We added that over the piece with the hole and nailed it down. It makes such a huge difference in the stability! 

Then, Ian began cutting and laying the flooring. This was flooring that was left at our house when we bought it and it matches the downstairs flooring. Here it is in progress:


Now it sits flush with the lip (which will also be stained- don't worry!) and makes for an even transition. 


Next steps:
-add two more coats of polycrylic to the treads
-add trim pieces on the landing

Here is the big question. What to do with those risers?! We originally were going to paint them white- and still may end up doing that. But a few other ideas floated around in my head as well. I've seen people add beadboard to them but I'm not sure that goes with the style of our house. The other idea I've tossed around is adding paintable wallpaper to the risers and painting it either white or black. The only worry I have with that option is the durability. 

Hmm... it will be a little while before I have to make that decision! I've got to keep this motivation up so I can add two more coats of sealant!!! Maybe being snowed in here in NC will help with that... NOT! I already want to eat junk food and drink hot chocolate all day long and I haven't even seen a snowflake yet!  


Sunday, January 19, 2014

Cafe Curtains

We have another update in the kitchen! And this time, it involves the window treatment! When we moved into the house, there was already hardware above the window for a valance. So I went ahead and bought a simple black valance and hung it up! 

Over time, the blinds were getting sort of gross... they are right above the sink and sometimes stuff splashes on them. Ew. So I wanted to get rid of the blinds but not the privacy. I hate having windows open when it is dark outside and the lights are on inside. It just sort of freaks me out and always has. So I knew I would need some kind of curtain. But I also like the light coming in from outside and Ian likes the light from his shop outside to shine in the window at night. That meant many nights of blind wars. I would close them because it was dark outside and light inside. And he would open them because he liked the light shining in. Well, problem solved... and the solution? Cafe curtains! Half privacy and half light- what a compromise! 

I was thinking the curtains would be a perfect opportunity to pull all of our kitchen colors together. Our walls are gray, our cabinets are white, and our countertops are gray, black, white, and tan. 


The faucet and hardware on the cabinets are oil-rubbed bronze and almost look black. 

So, I went in search of a fabric with black, white, gray, and tan. Much easier said than done! But here is what I found and... I'm kind of obsessed with it! 


It is an upholstery fabric, so it's thicker than a typical printed cotton. They are usually more expensive too but I lucked out and went on a day they were having a 50% off sale! 

This was fairly easy in terms of the sewing skill required. I just measured our window and added an inch to each side for the seam allowance. Then I did a double-folded hem all around the edges. That was it!! Then I hung and admired them!! 

Here are the before and after pictures:


Saturday, January 4, 2014

Bathroom on a Budget

Hello and happy new year! I made it through the holidays without losing my mind- hooray! Our holiday this year involved hosting in-laws for Christmas Eve dinner and then traveling (with dogs) to visit the other two sets of in-laws for about a week! It was crazy- as always- but so much fun! Before we left and before our company came to stay with us, I was determined to make a few updates to the boring guest bathroom upstairs- without spending a lot of money. Here is what it looked like before: 


Just a lot of blah and white. So I figured I could make a few changes (quickly) before our guests arrived. 

Step 1: I painted the walls with some leftover paint we had- the blue-gray color that we had originally painted our dining room. Cost= $0

Step 2: Updated the artwork using the existing frames. To do this, I googled "black and white bird picture" and "black and white tree picture", found pictures I liked, and printed them on regular printer paper. I spray painted the mats black, ripped open the back of the existing frames, and added the new photos- so simple! Cost= $0


Step 3: Paint the storage cabinet above the toilet. I had originally taken it down but realized that we truly need all the storage space we can get in this room!! It is tiny! I used leftover spray paint for this project. Cost= $0


Step 4: Frame the mirror. I used molding pieces found at Lowe's to create the frame. It makes such a huge difference! This project cost ~$35 and was the most expensive thing I did in this room. 

Here are the after pictures:


We would eventually like to replace the countertop and the floor (see below):


But these changes will do for now!! Thanks for reading!