Wednesday, April 24, 2013

DIY Yard Flag


I've been wanting a cute flag for the front flower bed, but I really didn't want to buy one... so after browsing Pinterest and Etsy, I found a cute burlap one I thought I could tackle! The first time I make something, I typically mess it up somehow... so if I made another one, I think it would look much better. And since this project was SUPER easy, cheap, and quick, I could make many more! Here is how I did it:

Step 1: 
Cut out a flag-like shape... make yours longer than I did! That is the one thing I would do differently. I didn't think about how far I would have to fold the top edge over in order to have a big enough hole to slide it over the flag holder. So now I have sort of a mini-flag! You can make yours with a point at the bottom or straight across. If you have another flag that you like, you could always use it as your pattern and trace around it! I was just winging it for this part...

 
Step 2:
Fold the edges over (about 1/2") and secure with straight pins.


Step 3:
Sew a straight stitch along each side.


**It doesn't have to be perfect... thankfully ;)

 
Step 4:
Pin the bottom. Mine was somewhat of a point so I just folded the edges over (about a 1/2") and overlapped them.
 
 
**Dixie was craving some attention during this portion of the project... she kept sticking her head under my arm, sweet girl :)

 
Step 5:
Fold the top edge over (far enough so that the flag will be able to slide onto the flag pole!!!) and it will look like the picture below. See how short mine is?! Oops...

 
Step 6:
Put the flag onto the flagpole to determine if it is so disproportionate that you will need to start over... keep your fingers crossed throughout this process... I would've loved to have a longer flag but I figured I could work with this one. Especially since it was getting late and I was determined to do this project in one night!
 
 
Step 7:
Cut out a zig zag shape from paper, any type of paper will do but thicker paper like posterboard would be best. I held it on top of the flag and used my disappearing ink pen to trace it.


Step 8:
Fill in the pattern with acrylic paint. I used a q-tip for this because I didn't have a small enough paint brush. A paint brush would probably be MUCH more efficient!
 
Step 9:
Look closely in the picture below to see this step! Do you see the "C"? Draw your letter on the flag with a disappearing ink pen. I did this freehand, you could always print out a letter from Microsoft Word in a large font, cut it out, and then trace it.

 
Step 10:
Fill the letter in with the color of your choice. I traced the outline of the "C" with a Sharpie marker first, then filled it in with black paint using my trusty q-tip!

 
Step 11:
Hang it up outside and enjoy!!
 
**I have NO clue how this flag will hold up against rain, wind, etc... we will see! I guess I could spray it with some type of protectant. But for now, because it was so easy and cheap to make, I am not all that concerned! I'll just make a new one if it gets ruined... a new, much longer one ;) 


Sunday, April 21, 2013

A few of my favorite things

I was feeling like shopping yesterday, without spending a lot of money. There was an antique festival in town but I knew I needed to stay far from that! I tend to lean toward furniture purchases at antique stores and I wasn't in a position to spend that kind of money. I also didn't have Mr. Crane's truck to transport anything... but if I wanted something badly enough, those who know me know I would have found a way!!!

So I went to our local Habitat for Humanity Restore, Goodwill, and Hancock fabrics.

I only spent $30 and I feel like I got some good deals!

Here is what I came home with:
-Big puke-colored vase $6.99 (Goodwill)
-Clear pitcher $2.99 (Goodwill)
-Stack of books $3 (Restore, they were buy one get one free... I got 5 because I can never find just one more that I like to get for free!)
-Brown basket $6 (Restore)
-Clear bird $3.99 (Hancock, on sale from $9.99)
-White basket with chalkboard $6.99 (Hancock, on sale from $9.99)

Total: $30, give or take for tax

Saturday, April 20, 2013

Wow, we've been busy!

Since I work for a school system, I am fortunate enough to have Spring Break! This year, Hubs took the week off too, with the intent that we could go somewhere fun. However, going somewhere fun often equals $$$! We have two dogs, which we can't always take with us everywhere and those boarding fees add up (along with our guilt the entire time we are away that they are locked in a small cage and bored out of their minds). So instead of taking a vacay, we decided to stay at home and finish/start house projects. Now to most people this does not sound like a good time, but we enjoy doing things around the house together. So much so that we (or more like I) start a gazillion projects and end up having no time to finish them!!! This typically happens because I get very excited and motivated over the weekend, start the project, and then run out of time and the new week begins. When the new week begins, my motivation quickly declines. Anyway, so that was our plan... finish anything we had started previously FIRST and then move on to any new projects we had in mind.

Our list included:

1. Repaint the dining room with crisp, clean edges (more on that later)
2. Resurface the back deck
3. Mulch our flower beds
4. Get some flowers for the front porch, preferably ones that don't die since I have managed to kill every plant I've ever owned. I may or may not have googled "hardest plants to kill" to come up with ideas...
5. Pour a concrete patio off of the back deck
6. Finish the half wall in our kitchen
7. And lastly, on MY to-do list and not necessarily the Hubs' to-do list was to rip off the tile backsplash in our kitchen and replace it... I think Hubs was skeptical that we would even have time to do this one, therefore he was not very worried. I, on the other hand, had that "I am going to do this no matter what" motivation so I made sure there was time.

I'll be posting details about #1, 2, 6, and 7 soon. I'll go ahead and tell you that we didn't do #5 because we changed our minds. And #3 and #4 are pretty self-explanatory and don't require much although I will tell you that I chose ivy geraniums for the hanging baskets on the front porch and so far so good!

Lampshades & Spray Paint

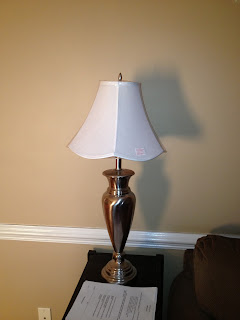
My oldest sister gave me two BEAUTIFUL milk glass lamps for Christmas. I am in love with them... and all milk glass for that matter. However, she bought me two white lampshades to go with them, and they were SO white that they made the old milk glass look dingy. But, never fear, I was able to use the lampshades for two different lamps! Not to mention that the milk glass lamps will be out of commission until I get them re-wired because Mr. Crane is so NOT cool with the old, frayed electrical wires. I don't see what the problem is ;) Here is what the lampshades looked like before paint:


I went to Pinterest (which is a never-ending source of inspiration and the cause of my never-ending to-do list) and searched for "spray painting lampshades"... I knew that somebody, somewhere, had already attempted this. And rather than ruining the shades, I figured it would be smart to do my research first! And after researching for probably half an hour, I found that it has and can be done! I decided on plain black. I did see a beautiful pair of black and white striped shades but I didn't think a striped pattern would work well with the shape of my shades. Or maybe I could imagine the stripes being crooked and not lining up by the time I made it around the backside.. same thing! Both good reasons to skip the stripes!

I started out thinking I would only spray the outside of the shade... ha ha. I brought it inside after painting two coats on the outside, turned the lamp on, and holy SPLOTCHES! It was horrendous! Back to the drawing board... I flipped the shades over and sprayed the inside with two coats as well. With fingers crossed, I turned the lamp on again and........... it was perfectly even! Good thing, because I didn't have a plan C in mind.

Here is lampshade with both sides painted, doesn't it look so much better? Just ignore that the table it is sitting on looks completely different. That is due to my inability to start and finish projects.


I feel so much more accomplished with my projects when I put the before and after pictures side by side, so here you are:


Let me know what you think!

Supplies Needed:
-Painter's tape
-Black spray paint
-Old cardboard or other surface to paint on

Total Cost:
$0
** We had everything we needed already, best kind of project! :)

Banister Makeover


When we moved into our house, there were a few projects that I knew I wanted to tackle right away. One of those projects was re-painting the banister. It was a lovely shade of oak... which I could not stand! I've seen pictures of oak banisters that look just fine, but oak is not my style.... that was my way of saying "No offense if you have an oak banister... I'm sure it looks great, it just isn't for me!" I tried to ignore it,  but I am not very good at that. Once I have my mind set on something, I can't stop thinking about it, which I'm sure Mr. Crane LOVES. I started this project while he was at work one day. Here is the before and after:


What do you think??! I still can't decide what to do with the oak part of the actual step... because painting it would be quite a challenge with it butting up next to that carpet (another one of my fave features of the house... NOT!) Any suggestions? I thought about trying to paint it white or black. Has anyone done this with carpet right next to it? I am envisioning a HUGE mess.

Supplies Needed:
-Foam brushes
-Good quality paint brush
-Paint tray
-Primer (I used Kilz so I wouldn't have to sand... can you imagine trying to sand all of this?!)
-White paint (I used semi-gloss paint for trim, the previous homeowners left it for us)
-Polycrylic (it can be used over white paint without yellowing)
-An entire afternoon... this project took WAY longer than I thought it would!

Total Cost:
$1 for foam brushes
** We had EVERYTHING else on hand, hooray!