Sunday, September 29, 2013

Fall wreath


I finally got around to making a new fall wreath and I have to say, this one is my favorite! It was also the easiest one I've made!

I just bought a plain grapevine wreath from Michael's... I was so disappointed that I didn't bring a 50% off coupon with me!!! But the wreaths were on sale so I couldn't use a coupon on those. As I was walking around the store, a sweet old lady asked me if I'd like to have her coupon. She said she didn't find what she needed so she couldn't use it! Score!! I continued browsing the store (newly acquired coupon in hand... determined to find something not on sale) and picked out some artificial fall flowers... which were also on sale! Lastly, I bought a wooden "C". It was only like $1.99 or $2.99 so I ended up giving my coupon to someone in line behind me since it wouldn't save me much! How's that for paying it forward?! ;)

When I got home, I used some leftover yellowish gold spray paint to paint my "C". I had originally wanted to stain the wood but Ian convinced me that it would blend in too much with the wreath itself (good call, babe!). 

While that was drying, I got to work on the flowers. All I did was snip the stems a little shorter and stick them into the wreath. No glue or anything required! Then, I cut a piece of burlap off of my yard of burlap (leftover from making a ring bearer pillow for my friend Lindsey). Why I thought I needed over a yard of burlap for a 5"x5" pillow project?! No idea. But I'm the type of person that would rather have too much of something than too little. And hey- it has come in handy on more than one occasion! 

Next, I googled how to tie a pretty bow. Because I am bow-challenged. By that I mean it comes out lopsided every. single. time. Thank you google for pulling through again!

Lastly, I attached the wooden "C" with picture hanging wire in two places. The only reason I didn't hot glue it (which would have been a little faster) is because our black front door gets SO unbelievably hot from when the sun rises until about early afternoon. So hot that it melts hot glue and wooden letters fall off of the door and get glued to the floor... yes, speaking from experience. Picture wire it was! And it is holding up wonderfully!! 

The best part is that you can switch out the flowers during different times of year rather than making a whole new wreath! 

Thanks for reading! 

:)

While you're here, feel free to check out my other posts here:
 
DIY Wall Art
DIY Front Porch Sign Holder
DIY Porch Welcome Sign
Our Staircase Makeover Project (in process) plus how we updated our Oak Banister
DIY Chevron Burlap Yard Flag

Monday, September 16, 2013

Staircase Makeover Part One


This was our staircase last week. 

This...


...is our staircase after this weekend! 

In my opinion, it already looks a million times better!

To get this far here is what we have done:

1. Rip the old carpet out. This was the most disgusting step. It makes me want to tear out all of the carpet in our upstairs. It was so dirty!!!! And the worst part was thinking about how the dirt could be from the previous owners... so it wasn't even our dirt. Blekkk. About 3/4 of the way through, I thought about the fact that I should have been wearing a mask. 

2. Remove the thousands of staples and nails that were keeping the nasty carpet intact! My hands are still hurting after this part. Talk about blisters. Using needle nose pliers to pry out each individual staple was painstaking to say the least. 

3. Vacuum the steps and clean up all of the hazardous materials (staples, nails, tack strips). 


...to be continued! 

Picture to Chalkboard

I've had this project on my mind for some time now... I've also had all of the supplies I needed. It was just a matter of doing the work! 

My mom gave me this picture a few years ago when she was redecorating. I definitely get my decorating ADD from her. We change our minds a lot and we both shop around our houses and move things around. We used to have this picture in our room in our apartment. But with the new house, I've sort of changed the color scheme of things. I just couldn't get rid of it because I love love love the frame! And big frames like this are expensive!! Here it is:


The hard part of this was the taping. When I say hard, I don't mean difficult. It was just time consuming. After taping around the edges of the frame, I got to spraying it with chalkboard paint! My favorite thing about this paint is how quickly it dried! So perfect for someone as impatient as I am! 


Here it is with the tape removed:


And the final product:


I haven't decided where I'm going to put it. Maybe at the bottom of our stairs that we are currently refinishing? I also haven't decided what I'm going to write on it. I've seen a lot of cute quotes that I like but as usual, I can't make up my mind. I'm also contemplating using a chalk pen rather than chalk to make it look neater. Decisions, decisions! ;)


Monday, September 2, 2013

Welcome sign

To hang on my sign holder, I made a simple "Welcome" sign. I have a feeling this is going to be the first of many signs! I can have a fall sign, a Halloween sign, a Thanksgiving sign, a winter sign, a Christmas sign, a Valentine's day sign- ok, maybe not a Valentine's day sign... but you get the idea! 

It is so easy to make! I found a scrap piece of wood that would be the perfect size. I drilled a hole in each corner in order to hang it. Then, I printed out the word "welcome" in a font that I liked. I taped it to the wood like this:


Then I traced the outline of the word with a pen. This transferred the indentations onto the wood like this:


I used a fine point sharpie to trace the letter outlines:


Lastly, I filled the letters in with a thicker sharpie and stained the wood with this stain:


Here is the end result:


 To see how I made my front porch sign holder, click here!


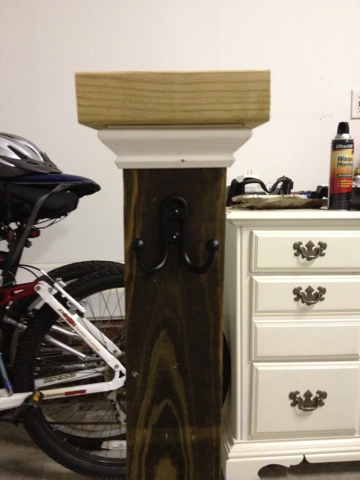
Front porch sign holder


This project has been on my to-do list for quite a while. I pinned a similar project on Pinterest some time ago and I am just now getting around to it. I was re-inspired when I started to think about fall decorations for our front porch. I was planning on decorating last weekend until I realized that fall doesn't officially start until September 22! I figured I could wait a little longer. Most likely I won't be waiting until September 22nd, but maybe I'll start next week!

Unless, of course, I am too tired from my first official week of therapy this week! Those sweet little children can be exhausting! I'm so excited to see my returning students and to meet my new ones! 

Ok- back to my project. 

Supplies needed:
-4x4 post 
-scrap wood
-scrap molding 
-hook
-screws
-spray paint 
-caulk
-finish nailer

Basically the steps were as follows:

1. Cut the post to the desired height.
2. Find some scrap wood to make a top and bottom piece.
3. Add molding around the edges with a finish nailer for a more finished look.
4. Screw hook into the post.


5. Caulk the molding. If you are great at cutting molding, maybe you can skip this step! But mine was very imperfect! It was late at night, I was outside by myself in Ian's shop... I sort of rushed through that part. And the whole time I was thinking, "Once I spray paint this, you won't be able to tell!"
6. Spray paint the whole piece.
6. Let dry!
7. Hang your sign! 

I'm hoping to make a little sign for each season! But for now, I just made a generic "Welcome" sign! If you'd like to see how to make one of your own, click here!  

Here it is one more time:


I'm pretty excited about it :)