Sunday, July 21, 2013

New Bathroom Shelves!

Ever since I took down the ugly, plain, and very securely attached storage cabinet above our toilet in the master bathroom, I have been trying to find the perfect thing to fill the space. In the meantime, I had to spackle and repaint the walls due to the gazillion holes they made hanging it. At first, I thought I'd put a picture in place of the cabinet. But although pretty, that isn't very functional. I wanted something that had a little storage space and was pretty to look at!

After seeing these shelves on Pinterest and reading the very detailed tutorial, I decided this was something I wanted/needed to do in our bathroom. Here was the picture I found:


Aren't they beautiful?! I love the way she styled them, with all of those adorable accessories! 

Her blog has a very detailed tutorial (thankfully)! So go read that for her specific measurements, more detailed diagrams and steps, etc. if you want to tackle this project yourself! 

This project was fairly easy! 

Tools:
-level
-measuring tape
-drill
-finish nailer

Supplies:
-wood
-screws
-Liquid Nails
-finish nails
-stain/finish of your choice

Here are the basic steps I took, including the changes I made from the Desert Domicile blog: 

1. Draw a really crappy sketch of what you are making so you can try to make sense of it all and figure out what type/size of wood you need. See below. This step also includes measuring the width of your space from wall to wall. 


2. Build your support frames with the help of your handsome husband, or whoever you have on hand. Lucky for me, it was my handsome husband ;) We used liquid nails to glue our frame together first, and then we used finish nails to attach the small pieces to the larger piece. 


3. Stain your boards. Or paint them. Whatever you'd like! I used the same product I used on our towel racks, Restor-a-Finish. I love it for so many reasons! Number one: you barely have to use any for each project. Number two: you don't have to wait for it to dry. Number three: it makes your wood look old in a matter of minutes! Number four: it brings out the grain of the wood so beautifully!


4. Measure the desired height of your shelves and attach your support frames to the wall, hopefully screwing them into studs. Caitlin @ Desert Domicile made reference to watching out for the plumbing pipes. That made me a little nervous.... but we used our stud finder, marked the wall, and hoped for the best... i.e. that what we were screwing into was in fact a stud and not a pipe and that when we flushed the toilet, water would not come out of the walls. Water has not yet come out of the walls so I think we're in the clear!


5. Make sure your top shelf piece is level... yeahhh, here is where we ran into a problem. See, what happened was, I tried to pick out beautiful boards that were perfect and straight. Well, it was hard enough finding beautiful boards. And I'm pretty sure I took down every single board in Lowe's to find the ones that were straight. At least somewhat straight. Well, the so-called perfect pieces that I chose were not so straight after all. They were all wonky. Is that a word? Well that's what we called them. All of them. Not a single one was perfectly straight. 


So we ended up with this:


This was not exactly how we had planned it. A humongous gap. Thanks wonky wood... this in turn meant our boards were not level. So we had to move on to step 6. 

6. Add shims to level out your shelves. 


Repeat this step for both top and bottom shelves. 

7. Glue the top shelf piece to both shelves using Liquid Nails. 


8. Glue the bottom portion of each shelf to the top and bottom shelves using Liquid Nails. Then call your husband to come shoot a few finish nails in the bottom because your arms are tired of holding the board while the glue dries. Caitlin @ Desert Domicile used screws for this step but screwing into this nice wood makes me nervous since it cracks so easily! 


9. Glue your front pieces onto the shelves. Yeahhhh, here's where we ran into the next problem. Due to the humongous gaps in our board placement (see steps 5&6), our measurements were all off. Now, the 1x4's that we bought were not wide enough to line up correctly. So we went back to Lowe's, had the friendly men (I say men because we pressed the help button and 6 of them came) rip a 1x8 down to a 1x5 (because they don't sell 1x5's and a 1x6 was too narrow to cut to a 1x5). The 1x5 worked much better. After our trip to Lowe's and staining the new wood, we proceeded with this step. I glued the front pieces to the shelves. After a few minutes I, once again, called my husband in to shoot a few finish nails into the corners because I didn't particularly want to spend the next 40 minutes of my life holding the panels up while waiting for the glue to dry (as suggested in Caitlin's tutorial... more power to you Caitlin but I am too impatient for that!)


And here is the finished product:


Here is a before and after:

BEFORE


AFTER


I'm in love! For now, I just shopped around my house to find things I could put up there! I'm sure I will change the accessories around a million times and buy more. I always do! 

Next on the master bathroom to-do list:
1. Rip out the fiberglass shower/tub combo, replace it with a deep tub, and tile the walls. 
2. Replace the countertops on the vanity.
3. Repaint the vanity cabinets! 
4. Replace the flooring. 
5. Frame the mirror. 

Some day... :) 

While you're here, feel free to check out my other posts here:
 
DIY Wall Art
DIY Front Porch Sign Holder
DIY Porch Welcome Sign
Our Staircase Makeover Project (in process) plus how we updated our Oak Banister
DIY Chevron Burlap Yard Flag
 
Thanks for reading everyone! :)


Monday, July 15, 2013

What's For Dinner: Tortellini

I made a delicious meal this evening that was so easy to throw together. I saw the recipe on Facebook and don't remember the source. It was originally a crockpot recipe, but I don't really plan ahead sometimes... so I made it into a "ready right now" recipe. Here's what you need:

-1 bag of frozen cheese tortellini (or 2 packages of dry tortellini)
-1 block of cream cheese
-2 cans of Italian style diced tomatoes (I had a hard time finding a can that said "Italian style", so I chose the one with basil, garlic, and oregano... sounded pretty Italian to me!)


-1/2 block of chopped frozen spinach 
-1/4 cup chicken broth
-garlic salt
-onion powder
-2 tbsp sugar

1. Boil your tortellini according to its package. 
2. While it is boiling, mix all other ingredients in a medium saucepan. Don't drain the diced tomatoes, just dump them in- juice and all! Break the block of cream cheese into small pieces so it will melt faster. Turn on medium-high heat and keep stirring. Heat until the cream cheese is melted and mixed thoroughly. 
3. Drain the tortellini noodles when they are finished. 
4. Add the sauce to the pasta and serve. 
5. Top with Parmesan cheese!

Enjoy! 

Cook time: 15-20 minutes 

Sunday, July 7, 2013

TV Over Fireplace

In order to maximize the space in our living room, we decided to mount the TV over the fireplace. 

Now... deciding to do it and actually doing it are two verrrry different things! But we got it done! Thanks to my hard-working husband and our friend Andrew, who just so happens to be an electrician!

Here it is: 


I still have to paint over the spackled holes on the right side, but try to ignore that. That is what I will do until I feel like opening up that can of paint again... 

Now we can get rid of the crappy TV stand we bought while still in college! And Ian is so very excited about the fact that his beloved recliner is now allowed to be downstairs. And I won't lie, I've used it just as often as he has! So it's a win-win! 

Since I still have the two ends of the mantel, I'm not sad about losing all that space. I typically only decorated the two ends pre-TV anyway with the exception of during the holidays. But we'll make it work! Now if only we could make our cable box work for the channels in the 200's... that's an issue for another day! 

Wednesday, June 19, 2013

From brassy to classy!

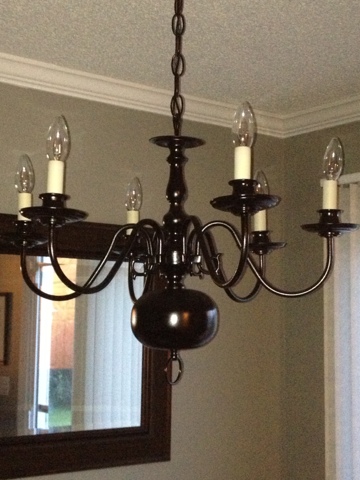
After a day of bargain hunting, I was very pumped about this chandelier:


This was probably the easiest DIY project I've done in a while! Here are the steps:

1. Stuff some tissue in the lightbulb sockets
2. Hang
3. Spray paint (I used black with a satin finish)
4. Let dry
5. Go buy lightbulbs while waiting for it to dry 
6. Wire it up! (much easier than it sounds!) 
7. Panic when you turn on the switch, prepared to enjoy the light in all its glory.... and only two of the bulbs come on!! Ahhhh! I had a freak out moment. I mean, there was really no way that I could have tested it before doing all that work unless I asked them to do it in the store... yeah, that probably would have been smart. Oh well. Crisis averted! I said a little prayer, crossed my fingers, and screwed the other bulbs in a little harder and to my surprise- they worked!!! All 6 sockets :) 


I think I am going to paint the white (well, off-white) candlesticks black before its all done. They are bothering me. If they were white-white, I wouldn't mind them. But the fact that they look like they are old white is bugging me. And when something is bugging me... it doesn't take long before I must fix it. That's a lie. Sometimes it does take long. But I still have every intention of doing it. And it will get done... eventually. 

And if I ask Hubs if he thinks I should paint those dingy candlesticks black, he will probably say, "Why are you even asking me... you're going to do it!" Which is true... but I at least like to throw it out there just to see what he thinks ;) 

My main goal was to find a chandelier that had lights which pointed up rather than down. Here is what we had before:


There is absolutely nothing wrong with it. But when I get something in my head, there's no stopping me! 

**UPDATE: I painted the candlesticks. And I LOVE it so much more now!!!


To paint them, I screwed 6 screws into a piece of wood and placed a candlestick on each one. Then, I sprayed away!!

What do you think?

Have a great day!! 


Nightstand makeover

In my previous post about bargain hunting, you saw these nightstands:


I got each one for $10. $10 people!!! I knew I wanted to refinish them, and I also knew I didn't have much to lose if something went wrong! I've been wanting a black bedroom set lately. I found one on a yard sale website that I fell in love with... I was looking around the house trying to figure out what I could sell in order to afford it. It was $1200... but it was beautiful!!! It was sold before I had the chance to sell my left leg in order to make it mine. So after mourning, I picked myself up and proceeded to plan B. Piece together my own bedroom set for way less than $1200. With these nightstands that cost $20 altogether, I'd say I'm on the right track! 

The first step was to sand the top of each one. They were pretty beat up on the tops, with cup rings, dents, and dings. All of that sanded right off! 

Then I applied a coat of Kilz primer:


The next step was to spray paint them. I used black Rustoleum spray paint in a satin finish. Each nightstand took almost 2 cans. 

Lastly, I applied a coat of Minwax paste finishing wax. I had never used this before. Typically, I would have used some type of polyurethane, but I have had bad experiences with polyurethane being sticky (maybe I did something wrong). So I decided to try wax. So far, I love it!!! I will let you know how it does in terms of durability. But the application was painless. You just rub a thin layer on, let it sit for 10-15 minutes, and buff it back off. 10-15 minutes is way better than waiting forever for polyurethane to dry so that alone makes me like wax better! 

I ordered new hardware for the nightstands. I wanted the hardware to match so they would look more like they belong together since they don't match. At Lowe's, these cup handles were almost $4 a piece. I found a 10-pack on Amazon.com for $25 ($2.50/piece). Thank you Amazon!! And I'll be needing all ten plus six more for my future projects! 

Drumroll, please........


$10 for the nightstand, $5 for the hardware, and 2 cans of spray paint which cost approximately $5 each! = $25


Here is a picture with the little lock piece added back on. I sprayed it silver, but I almost think I should go back and paint it black. Any thoughts??


Thanks for looking!!! :)

While you're here, feel free to check out my other posts here:
 
DIY Wall Art
DIY Front Porch Sign Holder
DIY Porch Welcome Sign
Our Staircase Makeover Project (in process) plus how we updated our Oak Banister
DIY Chevron Burlap Yard Flag


Monday, June 10, 2013

Bargain Hunting

Over the weekend, my friend Lindsey and I had planned to go to a few yard sales.I haven't gone yard-saleing (is that a word?) in a long time. I used to go with my Gram some, she goes all the time! There was a tropical storm threatening to ruin our plans with rain, but the bad weather was gone by Saturday! So off we went... Lindsey asked me if I was looking for anything in particular, I said no. She was looking for a mirror for her entryway and a chandelier for her dining room. I had just looked for a chandelier the day before and found one I liked a lot at the Habitat for Humanity Restore, but it was pricey so I left without it... more on that later.

We didn't really have a plan but I like doing things that way. I think I am a lot like my mother, but not in that way! If I were my mother I would have looked up all of the yard sale addresses, written them down, looked them up on a map, and then arranged them to find the most efficient route. She used to do that when we would go to Carowinds! Nope, not me!! We both had our iPhones, so we were good to go! They were all in the same general area (the same town at least) so we just bounced all around, sometimes (well, most times) not knowing where we were! And I loved it! Thankfully I don't get too car sick because we were making u-turns every other second, haha!

I didn't find much at the yard sales. But Lindsey found a sewing machine for $10! We were both so excited about that because she has been talking about wanting to learn to sew and I like when other people share my hobbies!! It makes it more fun! The only thing the sewing machine needs is a new foot pedal, which I found for about $20 online- so that is a total of $30!!! I looked up that same sewing machine online and it retails for $70. That's a savings of $40 people. Such a deal (as my Gram would say in her silly Gram way)! And to top that, the proceeds from that yard sale went to a girl in our community recently diagnosed with cancer. We also bought lemonade from the adorable little girls there :) 


After the yard sales, we stopped at a place called Grifton Yard Sale. It is a big building open two days per week. I believe it is associated with a church. I always drive by on the way to one of my schools and have been wondering what exactly it was like on the inside... so we decided to find out! They had a variety of furniture, building supplies, windows, clothes, knick knacks (my favorite... NOT), etc. I didn't find anything I couldn't live without there either. Lindsey found a swivel store (I think that's what it's called... the as seen on TV thing that you put your spices in) for $1!! I assume it retails for $19.99 because that is the magic price for as seen on TV items! 

After the Grifton Yard Sale, I decided to google antique stores in Grifton, NC and found one called "Some Like It Old". And off we went! We both love antique stores, too! This was a very cute store! And they just so happened to have a lot of sales going on. It is a store where there are multiple booths, each owned by a different vendor. So each booth had a different sale going on. I found an old nightstand that I thought I could fix up. It was only $20! I decided that even if it didn't turn out the way I envisioned, it was only $20! Well when the sweet lady at the register rang it up, I watched her cross out the $20 on the tag and write $10. Woohoo!!! Lindsey and I just looked at each other in disbelief! $10 sounded even better to me! 


Next on our list was the Grifton flea market. We had never been there either but I had seen it on my way to and from work. On our way in, Lindsey saw a mirror that she liked and I asked if she wanted me to jump out and ask about it.. she didn't think it was big enough for the space in her entryway. So we carried on. We stopped by and walked around for a few minutes (it is not very large) to all of the booths that looked interesting. There was one man who was selling various pieces of furniture. I found ANOTHER nightstand that I liked! When I asked the price he said $10. I was in shock! I don't think I could get two deals that good in one day! I told him I wanted it for sure. So we went to get the truck when we were done (yes, we drove Lindsey's husband's truck in anticipation that we might load it up with stuff). The nice man loaded the nightstand up for us, although we are fully capable :) Here it is, in all its glory:

On our way back out of the flea market, with nightstand in tow, we passed that mirror again. Lindsey had a look on her face... one of those "I will probably wish I had gotten that if I leave here without it" looks. I know that look well! So we stopped and I jumped out to ask the man how much he was selling it for. He said, "15 but ask her (Lindsey, who was sitting in the truck) if that's too much". Well, sir... if you say THAT we are definitely going to offer lower... wouldn't anyone? So we asked if he would take $10 and he said yes. Woohoo!!! The magic price of the day! Here is the mirror:

She figured she could find somewhere to put it. And not long after we left, she thought of a perfect place! She plans to repaint it. I can't wait to see how it turns out! 

Our NEXT stop was a place called The Venue. They repaint old furniture and home decor items and resell them. I like to go for inspiration, because I just so happen to enjoy painting/re-doing furniture. For those who don't, I totally understand why they would want to buy their pieces already done! We saw a lot of furniture we loved (but couldn't afford/shouldn't buy). And in the back of the store there is a warehouse of unfinished items that you can also buy. Back there, Lindsey found a chandelier! I couldn't believe she even saw it. I can't even describe how much furniture is back there. It is like a huge maze! Of amazing furniture that I would LOVE to own. Here it is: 

We both wanted to find one that we could spray paint to update. The price tag on this one had a bunch of jumbled up numbers... but it appeared that it said $3 on the tag. So we asked the owner to come back and tell us how much it was. She looked at the tag and said it looked like it said either $3 or $13. So she sold it to Lindsey for $13! I mean... it was a little higher than the $10 we were accustomed to spending that day, but it would do! ;)

Next stop was LUNCH! We were starving... We ate at Noodles & Co. I had never eaten there, I recommend it! It was delicious. However, if a staff member tells you something is "not very spicy"... assume that it is. Or you will regret it. 

Next (we were not finished yet!!) we went to the Habitat for Humanity Restore. I couldn't stop thinking about that chandelier, the way Lindsey wouldn't have been able to stop thinking about that mirror if she didn't buy it! It was still there. The tag hanging down from it said $40. That was the price on most of them.  That was the reason I didn't buy it the day before. I just kept thinking that price was WAY too high for an old brass chandelier. But I would have paid it if I had to... I really wanted it. We got a worker to get one down for me, but Lindsey noticed (once he got it down of course, oops!) that it was missing a piece. I asked him how irritated he would be if I wanted him to get a different one down instead. He said he wouldn't be, but I didn't believe him. He got the other one down and it was perfect! The most perfect thing about it was the price tag that was sticking to it (different than the tag hanging from it) which said $15! Now that's what I'm talking about! I may or may not have "lost" the hanging tag on the way up to the register... it turned out that all of the chandeliers had cheaper price tags stuck to them. I don't know what the deal was with the hanging tags. Here is my chandelier:

**I cannot take credit for the incredible floral sheet that it is sitting on. That would be Lindsey's. Give credit where credit is due ;)


Lindsey also found a lantern-type light for above her kitchen table. I am super excited to see how it turns out!


It is huge! It was a little more pricey at $30 and it is going to be a tedious process, but I think the end result will be totally gorgeous and worth it! 

Last, but definitely not least... actually, this was probably the most important step... we stopped at Lowe's! We had to buy the spray paint we needed to transform all of our outdated finds!!! 

Phew! It was a long day... we were non-stop from 6:30 am to 4:30 pm. Ten long, but fun, hours! 

How often do you find a friend that you can shop with for 10 hours without getting bored/tired/irritable??? I'd say I'm lucky! Thanks for an awesome day Lindsey! :D

Stay tuned for detailed posts of the chandelier and nightstand makeovers!


Wednesday, June 5, 2013

My next project...

I love black. I used to say it was my favorite color and I got strange looks. But that doesn't change the fact that I love it! So I'm thinking my next project is going to be.......


.....painting all of the interior doors in our house black! 

Why not? I've seen some great before and after pictures on Pinterest that have convinced me it would look awesome!

Here are pictures from the blog that inspired me:


Doesn't it make such a huge difference? I asked Hubs about this one... he shot it down. But I think he would love it as long as he didn't have to participate in it. Painting is not his favorite! I'll have to keep working on him... or just do it while he's at work! ;)  He would forgive me! 

The only thing I can see happening is  losing motivation halfway through. I'm pretty good at that! Or doing all the doors downstairs and not ever making it upstairs. We do have 8 doors just downstairs... that sounds daunting! Renae from the blog listed above said it took her about an hour per door... that's doable, right?! A positive would be that I wouldn't have to keep scrubbing our white doors thanks to dog noses... I'd rather live in denial. 

I'm thinking this project will be done sometime in the near future! To see a post about two of the doors I've painted so far, click here!

**This post is for my sister Valerie because she said she wants me to post about projects I want to do... so that she can see how long it takes me to actually do them. She just wants to know that I am slack too ;)